Settings
By clicking the Settings button below the folder list, you will be able to adjust a number of parameters to tailor EverDesk to your needs.
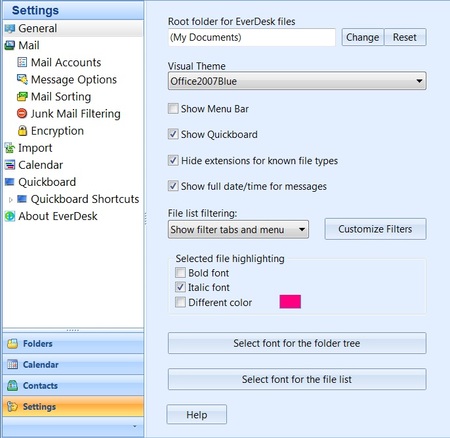
The Settings menu looks like this:

General
These settings affect the overall properties of your EverDesk
Root Folder
This is the top level folder in EverDesk. By default it is set to your My Documents folder. You can choose a root folder when starting up EverDesk for the first time, or via this settings menu.
Visual Theme
You can customise the look of EverDesk by selecting from a number of available themes.
Show Menu Bar
This toggles whether you want EverDesk to display the menu bar at the top of the screen. This contains the usual Windows menus such as File, View and Help with which you should be familiar with.
Show QuickBoard
This toggles whether you want EverВesk’s Quickboard to be displayed or not.
For more information on the Quickboard, see the QuickBoard section.
Hide Extensions for known file types
This allows you to choose whether you want to show file extensions (.xls or .txt for example) in the file list view. Seeing file extensions is useful to distinguish between different formats of a single file type (e.g. different videos in .avi or .mp4 format)
File List Filtering
Here you can choose whether you want EverDesk to display the filter menu bar (above the file list), the filter tabs (below the file list), or both.
You can also add / edit / delete filters by selecting Customize Filters.
To learn more about EverDesk’s filtering abilities, see File List Filters.
Fonts for Folder Tree and File List
Allows you to select the fonts for the folder and file lists in the EverDesk interface.
Selected file highlighting
You can choose the formatting which will be applied to files which you select in the file list.
You can choose from bold, italic and text color.
This section contains settings relating to your Mail preferences in EverDesk
Check Mail at Startup
This function will check (send / receive) mail for all of your active Mail Accounts when you open EverDesk.
Check New Mail Every …
This allows you to set EverDesk to check for new mail at regular intervals (POP mail only).
Display newly received attachments in file list
This function lets you view newly received attachments as expanded (open bundles) below their parent email automatically. See Open Bundles for more information.
Mark Messages as Read after viewing for…
Lets you choose how long (in seconds) it takes for an open email to be automatically marked as Read.
Show Classic Mail Folders
This option toggles whether you want to show classic mail folders such as Inbox, Outbox, Drafts, Sent Messages etc.
It is recommended that you leave this option un-ticked as EverDesk’s File List Filters offer more functionality and flexibility.
Pending Mail highlighting
This allows you to set a format for displaying pending messages (drafts, unsent and unread mail), such as bold, italic and/or highlight color.
Select font for plain text messages
This lets you select the font you wish to use in Everdesk for Plain Text (non-Rich Text / HTML) emails.
Mail Accounts
EverDesk supports both POP and IMAP mail accounts.
In order to set up mail accounts in EverDesk you will need information from your account supplier or ISP, such as the mail server details, username and password.
If you are using one of the following mail accounts, EverDesk will pre-fill the server information for you:
- Gmail or Google Apps
- Yahoo
- Windows Live Hotmail
- AOL
Adding a POP or IMAP account
- Go to Settings > Mail Accounts, and click Add to add a new account
- In the Identity section, enter your name and email address. This will create an Identity for this mail account.
- In the Incoming Mail Server window, enter the server details (e.g. pop.mail.yahoo.com) and make sure that the correct protocol and port details are specified. You can obtain these details from your mail account provider.
- If your provider uses SSL, check the option.
- Enter your username and password details, and check that the account works.
- Important: Before proceeding further, you must select or create a folder which you will be the default folder for this account’s mail.
- Finally, select whether you want to save a copy of mail on the mail server.
- Click Next
- In the Outgoing Mail Server window, enter your SMTP mail server details.
- Once again, make sure the account works, and then click Finish.
- Your account is now created.
Selecting a default account
- In your list of Mail Accounts, you can select your Default Account. This is the account that will be selected by default when you compose a new message.
- You can always specify mail for specific activity folders to be sent from other accounts using New Message Options.
Message Options
This allows you to specify default settings for new messages for specific activity folders, including which Identity and Stationery to use as default.
In EverDesk all outgoing emails are automatically saved in the current folder in which you were when creating the email.
Using Message Options, you can specify individual settings for specific activity folders, so that all new messages created within them will have certain properties such as a specific Identity or Stationery.
In order to set up custom Message options, you must first select the folder in the folder list for which you want to change the options. For new messages in this folder specify whether you want to use specific settings for this individual folder, or whether you want it to use the same settings as its parent folder or your EverDesk Root Folder.
The parameters you can change once you’ve selected the folder are:- Identity – this lets you automatically compose new messages from a specific identity (this is your From: address), and whether you want to always use this identity or use the identity to which the message was sent to when replying to an email. You can also easily manage your identities by clicking the Manage Identities button.
- Compose message format – this lets you select the stationery, rich text / HTML or plain text.
- You can manage your Stationery by clicking the Manage Stationery button.
- Smart Reply – This function automatically places incoming replies to your email in the folder from which your email originated from. It allows you to effortlessly keep all emails pertaining to a subject thread together in one place.
- The Smart Reply function is enabled by default. You can also specify the function settings here, by changing whether Smart Reply will override any sorting rules that you set up. If this is selected, then replies to your emails will be placed automatically with your outgoing message, even if there are sorting rules in place which would affect the incoming messages.
Mail Sorting
This is where you will find all of your mail sorting rules. You can add/delete and modify rules for sorting incoming mail.
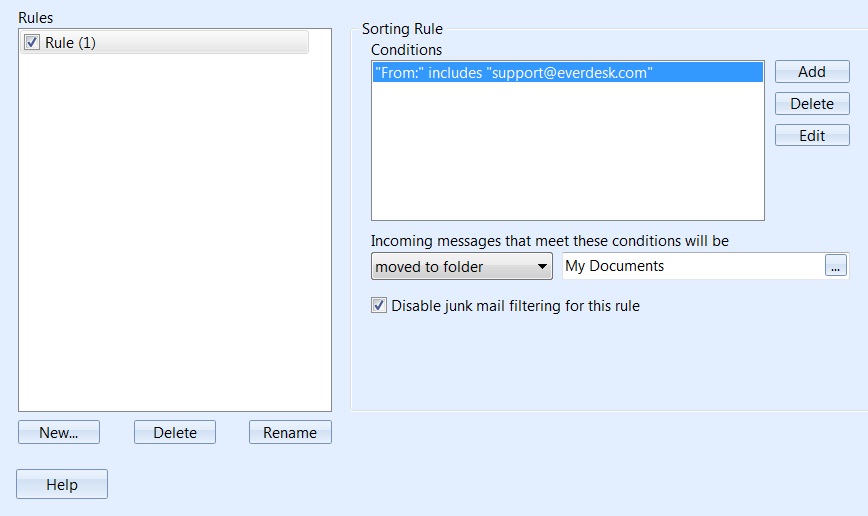
Using the sort tool (which you can also quickly access via the Sort button on the Main Toolbar) allows you to set up rules for sorting incoming mail automatically, based on a number of criteria (conditions).The sort tool interface looks like this:

To add rules:
- Click the New Button in the Rules section
- Enter a name for the new Rule. You will then see a choice of Conditions

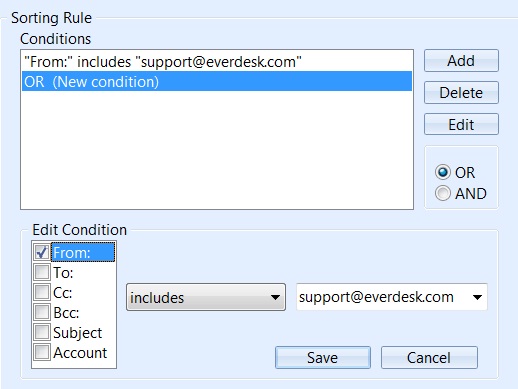
- Click Add to create new conditions.
- You can now set up the condition based on a number of options.
- You have a choice of different identifiers such as <equals, includes, does not include> and you can specify criteria for the fields From:, To:, Cc:, Bcc:, Subject, and Mail Account.
- If you select Mail Account, you will be able to select from the accounts you have set up in EverDesk.
- Specify the details of your condition (e.g. Subject includes “statement”) and hit Save.
- You will now see the condition in the Conditions list. You can Edit or Delete it using the respective buttons.
- You can repeat this to create as many conditions as you wish within the rule. When you create a second or subsequent condition, you will be able to select whether you want it to be assessed using “AND” or “OR”. E.g. You can specify <Subject includes “payroll” AND mail account is “Work”> or <Subject includes “Urgent” OR Subject includes “Important”>
- When you save the condition, you will now see a different section under the Conditions list, which will allow you to specify what you want Everdesk to do with incoming mail that meets the conditions you have created.
- Here you can select whether messages that meet the rule conditions are Moved to Folder, Copied to Folder or Deleted. If you chose to move or Copy the message to a folder, specify the folder you want the messages moved/copied to.
- You can also choose to disable Junk Mail filtering for any mail that meets these conditions (e.g. anything that comes from your boss’s email address).
- Your rule is now set up.
You can also add a sorting rule instantly by right-clicking the contact’s name to the right of a received file, and selecting Add Sorting Rule. You then simply select the folder where you want messages received from that contact to be moved to, and a rule will be added.
Junk Mail Filtering
Here you can enable Junk Mail Filtering in order to get rid of unwanted mail and spam.
Enabling Junk Mail Filtering will also activate the Junk Mail folder and allow you to mark messages as junk and put them into the Junk Mail folder.
You can select the level of junk mail filtering, from Low to High, as well as choosing whether messages received from the contacts in your address book are automatically excluded from Junk Mail detection.
You can also set the amount of time that Junk Mail will be stored in the Junk Mail folder before it is deleted.
It is recommended that you periodically review the contents of the Junk Mail folder to ensure that if any wanted mail ends up there by mistake, it does not get deleted.
Encryption (PGP)
EverDesk uses the PGP encryption to make your mail more secure.
Please see Please see PGP Encryption for more infromation. for more infromation.
Import
Everdesk lets you import your existing emails and contacts from a number of other email clients.
Please see Import for more information.
Calendar
Here you can change settings relating to the Calendar in EverDesk.
Show additional Time zone
- You can choose to display two time zones simultaneously in your calendar view.
- You can specify the second time zone as well as a label for it.
First Day of the Week
Work Days
- You can choose which days to include in your Work Week view
Work Hours
- You can specify your working hours which will create a highlighted area in the calendar event view to reflect your working day.
For more information on setting up Calendars, as well as how to work with them, see Calendar.
QuickBoard
Here you can change settings relating to the QuickBoard.
QuickBoard allows you to organise your most used files, folders, contacts, applications and links all together in a conveniently located space which is always easily accessible, without having to switch windows or programs.
Show QuickBoard
Toggles whether the QuickBoard is displayed at the top of your EverDesk interface.
QuickBoard captions
Here you can choose how many lines will be displayed as the caption below each item on the QuickBoard.
You can also choose the font for QuickBoard captions
QuickBoard Tabs
You can manage your QuickBoard tabs here.
You can create, delete, rename and move tabs as well as choosing whether you want EverDesk to auto-expand the QuickBoard when you hover your mouse over the tab.
QuickBoard Shortcuts
Here you will find the contents of your Windows start menu, as well as being able to create links to new documents.
New Documents
This is a list of new document types that is available in Windows. You can drag’n’drop or pick’n’drop any documents you want onto the QuickBoard. This will create a shortcut on the QuickBoard to create a new document of the selected file type when you click on it.
Windows Start Menu
Here you can choose any of the applications available in your Windows Start Menu.
Simply drag an application to the QuickBoard to create a shortcut to it.
Remember: You can always choose to open files with a particular application by dragging a file onto the specific application shortcut on the Quickboard. This will cause the application to open the file, even if by default it is assigned to another application.
Please see QuickBoard for more infromation.
About EverDesk
Here you will see all the details about EverDesk such as your software version, a link to the website and support.
